My Weight Loss Progress

Created by MyFitnessPal - Free Calorie Counter

Tuesday, March 19, 2013

Pinterest SUCCESS!

So, what can I say, I'm a pinterest addict!!! However, for us, this has been a great thing. Not only do I find lots of scrumptious food, I also COOK it. We were getting a very boring repertoire of recipes, and eating the same thing every week. I have found some amazing recipes, that hubby loves as much as I do, and we are eating much better lately. And I am quite happy to say this is a post full of pinterest successes, instead of the usual fails everyone loves.

Below you will find a review of six recipes we have tried lately, as well as the links back to them. To get to the website of the original recipe, just click on the caption under the picture for the recipe you like. ENJOY!

Gluten Free Mexican Rice and Beef


One of the first ones we tried was Gluten Free Mexican Rice and Beef. It was pretty good. A few suggestions: make sure you have a 2:1 ratio of liquid to rice. Especially if you are at a high altitude like I am! Use a giant soup pot, not a pan. This gives you enough room to stir up the contents and not make a huge mess of your stove. I also added the tomato sauce right from the beginning, instead of waiting to see if it needed it. And just leave the meat in the pot the whole time, and let everything cook together.


Mongolian Beef


Next we had Mongolian Beef. I have tried quite a few Mongolian Beef recipes over the past few months, and this is by far, the best tasting one, and most like what we are used to from this fantastic Chinese restaurant we left behind in NC.


Crock Pot Shredded Beef Tacos


CrockPot Shredded beef tacos were next. Not one of favorites. It was way too much chili sauce, but not enough flavor. The meat still tasted like beef, not yummy mexican flavors integrated in beef! Another favorite recipe of ours is crock pot salsa chicken, that is just fantastic. Its just a 24oz jar of salsa, a packet of taco seasonings, and juice of a lime (which I often leave out), and frozen chicken breasts. Cook on high for 4-5 hours. YUMMY!! I bet it would work just as well with the beef if hubby wanted it, and it comes out really flavorful with the chicken.


Sweet and Sour Chicken


Sweet and sour chicken was another so-so recipe. It was a lot of work, and it wasn't that fantastic tasting. We usually use a sweet and sour sauce out of a jar, and its really good. And takes no effort. Think we will stick with that for now.


Lemon Chicken and Angel Hair Pasta

Our absolute favorite recipe we have tried was the Lemon Chicken with Angel hair pasta and spinach. I do suggest using a large pan for this. And do NOT get super zealous in zesting the lemons. I got every bit of zest off both of the lemons, and it was WAY too lemony. I also accidentally dumped a ton of red pepper flakes in, and couldn't get them all out. So it wound up super lemony and spicy!!! But that was just me and my stupid clumsiness. It was still fantastic, and we ate the leftovers the next day, and enjoyed it just as much!


Chocolate Cherry Bombs

And these chocolate cherry bombs were the best desert I have made in a LONG time. They are really labor intensive, and very very messy, but I think if you made them in a cake pop pan it would work, and be a lot easier. Only had one casualty, as you can see below.  I dipped the ball into the slightly cool chocolate, it was too thick, and when I pulled it out, the ball just crumbled. But dont worry, it tasted great.


Now, if that hasn't made you thoroughly hungry, I dont know what else to tell you!!!


(All pictures were taken from the blog/website of the original author. The cherry bombs is my personal photography)

Wednesday, January 2, 2013

2013 Goals

Well, 2013 is here, and like any good American, I have a whole list of resolutions to keep!! Most have to do with my jewelry business, and one is a personal weight loss goal. I am writing them out here, and plan to check back at the end of each quarter, so that I can make sure I am staying on track, and make any modifications that are necessary. So, here you go!

Goal #1
To double my revenue on etsy. Last year I made just shy of $1000. This year I want to make at least $2000.  With changes that etsy has made, they don't count items sold, so its too much work to calculate this. And just looking at gross sales is easy to track. I will not worry about taking out etsy/pay pal fees, or about taking out shipping. I will look only at gross income from sales.

Goal #2
To organize, and keep organized, my office space. This includes keeping track of all receipts and expenses, and logging them to make tax time a LOT easier. I bought a few "organization bundles" from HappyOrganizedLife on etsy, and have them all printed out and in a binder, so I am starting off the year very strong!

Goal #3
To spend at least 5 hours a week on designing and creating new products for both my etsy shop, and my friends gallery where I have a display. My new nifty organization goodies will make it easy to plan my week, as well as track what I actually did!

Goal #4
To have at least 150 items in my shop by the end of the second quarter, and 200 by the end of the third quarter. The more inventory, the more opportunity for people to fall in love and buy :)

Goal #5
One of my dearest friends, Libbi, of MtBaldyGlassworks, has opened her very own Artisan Loft and Gift Gallery. I have a nice little area in prime real estate in her shop. She opened on Oct 1st, and I had my jewelry in there since the middle of October. In both October and November, I made just over $100 per month, after all applicable taxes and fees were taken out. I did MUCH better in December, though I don't know the exact numbers yet. Since this is a brand new venture for everyone, I'm going to set my goals lowish, with the hopes of surpassing them. If necessary, I will reset the goals higher at the quarterly check in. So, my goal is $150 per month, for a total of $1800 for the year.

Goal #6
This one is my personal goal. I have gained a huge amount of weight over the last 6 or so years. Most of it was initially caused by medications, but I also did nothing to modify my diet. This weight has taken a tole on me, and its time for it to go. Last year I lost a total of 34 pounds. I still have about 93 pounds left to lose. My goal for 2013 is to lose at least 75 pounds. This progress will be easy to track, because I have a nice little widget at the top of my blog, which automatically updates my weight loss every time I log it.

See you in three months for a check up!!!!

Friday, December 28, 2012

2012 Year End Goals Wrap Up


Goal #1
To sell 104 items on etsy in 2012. This averages out to 2 items a week. My first year on etsy I sold about 1 item a week, however last year I didn't even reach that benchmark, so I am leaving this at 104 sales for the year, with the hopes of blasting this year out of the park.

How did I do in 2012? Well, sales number wise, I did not reach this goal, as I only had 27 sales. BUT, if we look at revenue, I did awesome! Lets break it down:

Year
# of sales
Gross Sales
2010
58
635.5
2011
22
304.57
2012
27
981.21

So, why the drastic increase in revenue, but not number of items sold? It’s a two-fold thing. The first reason is that I made a lot of “destash” sales, AKA beading supplies I no longer needed, in 2010 and 2011. In 2012 27 of my sales were for destash, and in 2011 8 of the sales were destash. I had no destash listed, or sold, in 2012.

The second reason is that I had a few multiple item sales in 2012. I did one bridal order, which consisted of 6 necklace and earring sets. Then I had one customer who bought 3 necklaces, and another who I made 2 custom necklaces for. So the quantity of jewelry purchased increased. Also, I sold more “big ticket” items, such as necklace/earring sets, not just individual earrings.


Goal #2
To participate in 2 shows in 2012. I foresee lots of changes in our near future, so I am not going to push too hard on doing lots of shows. I am going to take my time, and research the venues thoroughly, so that I can maximize my potential for profits.

Well, I did do 2 shows in 2012. So I succeeded in this goal. The first show I did up in Northern California, where I was living at the time. It rained for the first few hours of the show, then it changed to snow. The turnout was poor, and they closed down early once the snow came. I don’t remember exactly how much I made, but I know I made my booth fee back, plus around $100, so I was okay with that.

Then I did a second show in Durango, CO, about an hour from where I now live (yes I lived in 3 places this year). That show was SLOW! I made my booth fee, then $22. Which I promptly spent on earrings and commissioned a large pottery utensil holder from another seller. Sales wise it was a bad show for everyone, except the pottery lady, who about sold out! But I met lots of nice people who live near where I now live.

Goal #3
To maintain at least 100 items in my etsy store. This will allow lots of diversity in my shop, as well as giving potential customers plenty to choose from.

I kicked butt on this goal J Except for maybe a total of 2 weeks the whole year, I had 100+ items in my shop.

Goal #4
To dedicate 5 hours per week to my shop. Whether that means creating, photographing, editing, or listing. 

Yeah. Not so much on this one. My year started off with a bang. Literally. On my way to work, on the second day of my job, I was in a major car accident. So life was hectic for awhile. I was also living with my great aunt for the first 8 months of the year. She was sooo generous to let me stay with her, and I didn’t like to spread my mess around her house. So I mostly worked when she was away. Then in mid-august I moved to Farmington, NM where my husband got placed with his airline. We quickly found a house and moved in. So the last 4 months I have been spending more time creating. Which has shown in my hands. I have developed an “overuse injury” from the increase in beading, as well as my day job as a physical therapist assistant, where I do hours of trigger point and deep tissue massage.

Goal #5
To maintain better records on how my time is spent, my supply purchases, and my sales. Also to keep a notebook full of the things that I need to work on, as well as ways to prepare my shop for the trends of shoppers.

I did good at this for about a week, but then quit tracking. Then when etsy added a “browse” search feature, I spent a good amount of time keeping track of keywords and trends. I tried to stay on top of the trends, but honestly, I failed. So maybe for 2 weeks out of the year I know how my time was spent. As for purchases, I have receipts all over the place. But thanks to etsy’s tracking of stats, I have a nice record of all the sales I made on etsy.

Overall it was a more profitable year. I learned some good lessons, and know what directions I want to take in 2013, including “off etsy” sales goals.  

Tuesday, November 13, 2012

Dreams DO come true!

Look at this view!! Would you want to leave this??
One of my good friends, and teammates, is proof of this! She wanted to open a shop to showcase other artisans, and have a studio space for herself. The problem wasn't the studio, as she had an AWESOME space at her husbands business. Unfortunately it was 45 minutes (on a good day) down into the lovely valley of southern california. Smog anyone? She was tired of driving down the mountain, away from her beautiful home that she had worked so hard to move to.


Mt Baldy Glassworks Studio and Artisan Gift Loft


One day she found the perfect 100 year old building, in her beautiful town, that she could rent and turn into her dream place. She worked hard for a couple of months renovating and cleaning the building until it became a presentable space. Then she advertised for artisans, and got more than she could have ever dreamed of! Another month of work was spent getting the shop all put together with the beautiful artwork. And on November 3rd, 2012, she had her grand opening, which was, of course, a roaring success!

Mmmmm delicious goodies at the Artisan Loft
The front entrance of this beautiful building.

Libbi Shorts of Mt. Baldy Glassworks is the propritress and a wonderfully talented artist!! Her glasswork is amazing beyond words! You can find lots of items at her online shop: MtBaldyGlassworks.etsy.com


 Welcome to the Artisan Gift Loft, enjoy your tour of amazing artwork, handmade goods, and a truly wonderful historic building.
The "security guards"


A cozy little nook to read in front of the wood burning fireplace.


Libbi's amazing hubby, who put in so much work to help her with the space,
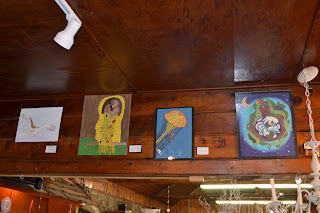
and one of the featured artisans (thats her artwork in the pics right above)
The wonderful local band who came to play!
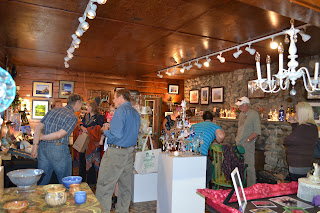
Lots of happy customers!


The stunning patio near sunset time


 Even the bathroom door is awesome!
 It was painted by Libbi's son, along with the whole bathroom,
but this is  all I could get a picture of :(

Tuesday, November 6, 2012

When Hubby Is Away...

I Shall Redecorate.

A few weeks ago, I decided my boring storage cabinet needed an update. And not just any update. It needed bright blue chalkboards!!! And a cork board and a schedule.

The outside of the cupboard, pre-Reno

The first thing I had to do was quite boring. I had to take the backing off and fix one of the shelves that was in backwards (yes I may have a bit of OCD). Then I had to put the backing back on, with no nails poking through to the front.

Next I took the doors off and collected all my supplies. I choose a stunning bright blue paint- called cool cobalt. I just love the name.


Ready, Set, Go


After sanding the panels and taping the panels, I began painting. Since I could only find chalkboard paint in very dull boring colors, I chose to go with regular paint, and a clear chalkboard coating. It took 2 coats of the stunning blue, then 3 coats of the chalkboard coating. The chalkboard coating I got from Hobby Lobby.

The doors drying away in my living room

While the paint was drying, I installed a cork board panel to the back of the cabinet, as well as a dry erase weekly calendar. I organized my paper crafting goodies and shipping supplies on the top shelves. On the top of the cabinet are my photo supplies, bulkier display pieces that I use regularly, my toaster oven, and baby crock pot for pickling jewelry. On the lower shelves are my cricut, more beads, polymer clay supplies, metalworking supplies, and other odds and ends. I really need to go through the bins and organize and purge. In front of the cabinet you can see my craft table and my rolling storage cart full of beads and findings and supplies.

My Little corner of the guest room.

Here you can see an up close view of the cabinet, with the pretty blue doors, and the corkboard and planner along the back.
My beautiful updated cupboard.
What do you think?


Tuesday, October 2, 2012

DIY Folded Earring Card/Display

I spent many hours trying to figure out how to make some earring cards that would work as a display, and then could be folded up as a little package. I would bet money I had seen something similar before. However, after lots of research I could find nothing like I had envisioned. Now, part of the problem was that the design in my head was not possible. But, I still couldn't find something exactly like what I finally created either. After aforementioned hours of failures, I finally got it right. I thought many other jewelry designers might appreciated a little tutorial to save them the hours of frustration I suffered :) I think the handmade packaging adds the perfect final touch to a handmade product.

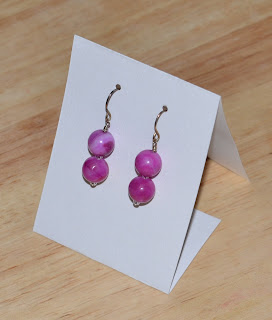
The earring display!

So here you go, step by step instructions, with pictures. This is a picture of the supplies that I used to make these cards. A paper cutter, 8 1/2" white cardstock, scissors, a 1/8" round hole punch, a bone folder, a craft knife and a plastic folder. I also used a dime, but any small round object would work.


Step 1: I decided what size I wanted my earring cards to be when they are standing up. I decided on 2" wide by 2 3/4" tall. So 2 3/4" tall, times 2 for the front and back, plus 1 1/2" for the bottom. That gave me a total length of 7". I then cut my white cardstock into 2" by 7" strips.


Step 2: Using the ruler, I measured 2 3/4" of length, and started the fold. I made it a sharp crease using the bone folder. (Don't worry, they aren't made from bone anymore, just plastic)


Step 3: Using the bone folder, I folded up the bottom tab, completing the folds.

Step 4: I used a plastic report cover I found on clearance for 42 cents!! But any thick firm plastic would work just fine. I cut off a strip, about 2 inches wide, since thats the width of my earring cards. Next I figured out where I wanted my holes placed on the card. I then punched holes where I wanted them.
 I wrote "top" so I wouldn't get mixed up :)


Step 5: I lined my template up at the top of my earring card (unfolded!) and punched the holes. I tried using a paper template, but I just kept making the template holes bigger. The plastic worked much better, because I was able to "seat" the hole punch in the hole, and make it much more precise.
Step 6: I folded the card back up, and drew a little line in pencil, for where I was going to put my slit.

Step 7: I opened the card back up, and using the craft knife and the dime as a template, I sliced a half circle along the line, with the convex part pointing down toward where the flap would fold up.
(If anyone is aware of a paper punch that would make this shape, I would be eternally grateful, as this is the most tedious step.)


Lastly, I placed my earrings inside and folded it up in a nice little package! 
The final product.
These are perfect little displays if you do shows or have your jewlery in a shop. The earrings are displayed very prettily, and then when they are purchased you just have to fold the paper the other way, and close up the package. As a final touch you could place the earrings in a box, a pretty bag, seal with a sticker, or some other pretty little finishing touch. You can finish this off in many ways to personalize it and put your brand on it. You can use any color or pattern of paper you want. The size can be adjusted to fit your personal designs. The options are essentially limitless.

Hopefully this little tutorial will help someone create the earring display/packaging they have been wishing for!

Side note: There are a couple of "earring card punches" available on the market. One is insanely expensive. The other makes a large slot for leverback earrings, as well as the single hole for post or wire earrings. Its a personal choice for me, that I don't like the look of the large slot for leverback earrings. If you don't mind the look, the hole punch would make this process much simpler, as you wouldn't need the template.